2021年10月27日星期三

群晖搭建h5ai-docker映射目录

来源

http://www.nbpilot.com.cn/2019/05/15/190515%E7%BE%A4%E6%99%96%E4%B8%AD%E7%94%A8%20Docker%20%E9%83%A8%E7%BD%B2%20h5ai%20%E6%96%87%E4%BB%B6%E6%9C%8D%E5%8A%A1/


 运行 docker,在注册表里面输入 h5ai 搜索,找到 clue/h5ai 的这个,点击下载。文件不小,大约有 270 M,需要点耐心等待其下载完成。


细节

装载路径是

/var/www

把docker内部80端口映射出去任意端口即可

2021年10月14日星期四

群晖挂载阿里云盘

 群晖套件中心右上角设置-添加社群(自定义源)

http://spk.bobohome.store:8880

然后进入社群搜索panindex安装。密码默认panindex

panindex挂载阿里云盘真的美观,最大特点是,走阿里直链飚上10MB/S小儿科

预览页面https://t1.noki.icu/


获取token方式

https://blog.deepfal.cn/index.php/archives/890/


clouddrive挂载webdav方式,方便群晖cloudsync hyperbackup等

http://www.92nas.com/forum.php?mod=viewthread&tid=341


群暉Synology搭建Trojan TLS 443 服務端 (关联XRay/V2Ray/)

其實不難,但坑不少。我幫你們都排了..

广东移动连过去香港群晖Trojan TLS服务端效果如图


需要:

1>公網ip群暉,路由端口转发80/443到群晖IP,

2>ssh操作:xray二进制文件放到usr/local/xray目录下(xray包含trojan核心)

3>xray config 證書路徑指向群暉DSM自己註冊的證書

4>群暉默认服务佔用了443,nginx改掉,讓位給xray


下面是具體操作:


0#公网路由443 80端口转发到群晖IP步骤略过

白群晖可以用自己免费域名,或自备域名

下图页面填入域名,自签证书,1,2,3,4,5,6,7步骤


申请下来的证书为了trojan服务端使用

群晖开启ssh,用群晖账号密码登陆,输入sudo -i再输入一次密码进入root

证书位置在

cd /usr/syno/etc/certificate/_archive

输入ls

随便进入第一个文件夹如cd 11iTmy

vi renew.json

会看到"domains" : "test.mynas.com",

检查test.mynas.com是否你的域名

是的话就OK了

不是的话,输入cd../ 

进另一个文件夹看

找到你域名文件夹后

chmod +x .*


给你们留个底,下面两行到时给服务端config.json用(红字改为你的文件夹)

/usr/syno/etc/certificate/_archive/11iTmy/cert.pem

/usr/syno/etc/certificate/_archive/11iTmy/privkey.pem


#下面下载xray二进制文件(xray包含trojan/v2ray/shadowsocks等)

cd /usr/local/

mkdir xray

cd xray

github里的文件都下载到群晖xray文件夹里

chmod +x .*

vi config.json

改路径,对应上面红字那两行,改为你的

:wq后,运行xray

./xray

你会发现群晖443端口被nginx占用

ctrl+c停掉

vi /usr/syno/share/nginx/WWWService.mustache

看到两处443,按i都改成440,

esc:wq保存退出

nginx -s stop

 停掉nginx,过10秒DSM会自动重启nginx,这时候他就占用440让出443了

cd /usr/local/xray

./xray &

恭喜你trojan服务端正常启动!


v2ray客户端服务器填群晖域名,


测试下连接。能开google的话说明xray工作正常,ssh 按ctrl+c停止


群晖自启动方式

新增计划任务-自定义脚本
输入一行
sh /usr/local/xray/start.sh


xray除了跑trojan服务端,其他官方范例看这里


后话:跑xray xtls也完全可以,甚至自带回落www文件夹自己搭个小站so easy

群晖的web station可以打入冷宫了~(误)

 tg@leonseason

2021年9月7日星期二

xray 基于nginx一键脚本,直接访问域名=emby套域名https tls

ubuntu 20下测试OK

准备好域名,用xray一键脚本基于nginx的

bash <(curl -Ss https://raw.githubusercontent.com/paniy/Xray_bash_onekey/main/install.sh)

选择3

搭建好后

编辑 /etc/idleleo/conf/nginx/xray-server.conf


 location / 改成如下就行


        location /

        {

        # Proxy main Jellyfin traffic

        proxy_pass http://127.0.0.1:8096;

        proxy_set_header Host $host;

        proxy_set_header X-Real-IP $remote_addr;

        proxy_set_header X-Forwarded-For $proxy_add_x_forwarded_for;

        proxy_set_header X-Forwarded-Proto $scheme;

        proxy_set_header X-Forwarded-Protocol $scheme;

        proxy_set_header X-Forwarded-Host $http_host;


        # Disable buffering when the nginx proxy gets very resource heavy upon streaming

        proxy_buffering off;

        }


参考:
https://www.262235.xyz/index.php/archives/141/

2021年8月28日星期六

华擎j3455 暴风二期 PVE开启 直通 解决网卡无法直通

来源:

https://koolshare.cn/thread-166076-1-1.html

概要:因为华擎j3455开PVE直通后有些问题,多网卡变为一组导致无法直通
解决方法
基于PVE6.2(6.0的有点问题,5.3有点老)
http://download.proxmox.wiki/iso/proxmox-ve_6.2-1.iso

母鸡pve ssh要做一些操作,以及安装补丁


nano /etc/default/grub
GRUB_CMDLINE_LINUX_DEFAULT那一行ctrl+k删除一行

添加下面一行

GRUB_CMDLINE_LINUX_DEFAULT="quiet intel_iommu=on pcie_acs_override=downstream"


nano /etc/modules

添加下面4行

vfio

vfio_iommu_type1

vfio_pci

vfio_virqfd


#ssh输入

update-initramfs -u -k all


下面是pve 6.2 j3455直通所需文件

https://wwx.lanzoui.com/iXVNBta68tc

解压本zip里面文件到pve下面文件夹

cd /root/dpkg

ssh输入

dpkg -i *.deb

reboot

-----------------完成--------------------------------------

提供一个pve直通好使的openwrt img
https://wwx.lanzoui.com/ii2ILta6c9g

新建KM虚拟机,编号100

qm importdisk 100 /var/lib/vz/template/iso/openwrt-x86-64-generic-squashfs-combined-efi.img local-lvm

脱离原本硬盘,挂载新硬盘,脱离cdrom,设置启动项

挂载pci设备直通,一般是第二个网卡
先不用勾选开机启动,出问题可以插拔电源线恢复

多重启几次KM和pve检测


2021年7月1日星期四

rclone mount 挂载命令收录

nano /etc/crontab

开机自启动

@reboot root rclone mount --allow-other --dir-cache-time 48h --vfs-read-chunk-size 64M --vfs-read-chunk-size-limit 5G --buffer-size 256M --umask 002 --cache-dir=/tmp --vfs-cache-mode writes gdrive:video /mnt/gdrive --daemon 


rclone mount --allow-other --dir-cache-time 48h --vfs-read-chunk-size 64M --vfs-read-chunk-size-limit 10G --buffer-size 512M --umask 002 --bind 192.168.1.132 --cache-dir=/volume2/TestHd/vfs --vfs-cache-mode writes --log-level DEBUG --stats 1m crsjone:/  /volume2/TestHd/crsj5


2021年5月12日星期三

群晖挂载世纪互联

 1:群晖开启ssh

2:ssh用群晖账号密码登陆后,sudo -i再输入一次密码,进入root

3:安装rclone

curl https://rclone.org/install.sh | sudo bash

4:世纪互联开API

空全局,重定向输入

http://localhost:53682

复制客户端ID

新增密码,复制密码

设置文件权限,输入file 打钩6个,管理员打钩

准备好sp site-id

win rclone 1.52魔改

https://wwx.lanzoui.com/iYFGYp1ktuf

win xshell或CMD进入到rclone文件夹后输入以下获得字符串

rclone authorize onedrive "28fd7b63-bf19-4cf1-8a76-e2a7c262d3e0" "M0eML~8td_N31.nxp__an7a76LpMLZT" --onedrive-is-21vianet-version=true


 rclone config挂载世纪互联需要API客户端和密码,字符串,site-id 。这几样上面都准备了

挂载成功后

假如群晖有共享文件夹s1,里面新建了空文件夹123

可用下面字段挂载世纪互联到123

rclone mount share1: /volume1/s1/123 --allow-other --allow-non-empty --daemon

实测电视通过nplayer 流畅播放SMB群晖里的世纪互联30G蓝光原盘


TG@leonseason

2021年4月23日星期五

GCP Debian 9 DD成 Windows 10


来源https://sunpma.com/137.html


开一台Debian9 机器

Debian/Ubuntu

  1. apt-get install -y xz-utils openssl gawk file wget

一键脚本(先看完下面文字)

  1. wget --no-check-certificate -qO InstallNET.sh 'https://moeclub.org/attachment/LinuxShell/InstallNET.sh' && bash InstallNET.sh --ip-addr 10.168.0.7 --ip-mask 255.255.255.0 --ip-gate 10.168.0.1 -dd 'https://oss.sunpma.com/Windows/Whole/Win10_LTSC_64_Administrator_nat.ee.gz'


红字填你的下面 圈起来这个


橙字,复制你的内部IP,例如10.168.0.7

把最后两位改成0.1,变成10.168.0.1


GCP输入完回车,提示block 9万多后会停止。然后机器等待1-1.5小时,

就可以用win自带远程协助连接了

点开始-输入远程-输入GCP公网IP

账户:Administrator 密码:nat.ee

2021年3月21日星期日

通过sh脚本方式使用cloudflare DDNS动态域名

 原文https://blog.natcloud.net/cf-ddns.html


下面本人操作概要:

cf新建一条A记录域名,IP 1.2.3.4,黄色云点成灰

wget  -N --no-check-certificate https://raw.githubusercontent.com/yulewang/cloudflare-api-v4-ddns/master/cf-v4-ddns.sh


chmod +x cf-v4-ddns.sh

nano cf-v4-ddns.sh


这脚本要改的地方有下面4个,其余不用变


#你的【Global API Key】

CFKEY=975bca44534******65204f


# CFUSER=cf登陆名

CFUSER=leon@gmail.com


# CFZONE_NAME=你的域名(顶级域名,非二级域名)

CFZONE_NAME=super.com


# CFRECORD_NAME=你的cf需要ddns的二级域名

CFRECORD_NAME=s7.super.com


执行

./cf-v4-ddns.sh

网页F5刷新,检查1.2.3.4是否变成你的公网IP


都OK的话,crontab -e计划任务添加一条

1 * * * * /root/cf-v4-ddns.sh >/dev/null 2>&1

每小时运行一次


2021年3月16日星期二

Windows 创建软连接-onedrive同步

想让Windows Onedrive 本地文件夹内的一个文件夹是其他地方路径,来完善自动同步


环境:D:\onedrive\ 是onedrive同步文件夹,且里面无otherfile这个文件夹

C:\Users\Administrator\Documents\WXWork是想onedrive顺便同步的文件夹


操作:

管理员模式进入cmd

mklink /d "D:\onedrive\otherfile" "C:\Users\Administrator\Documents\WXWork\WeDrive\"

2021年2月7日星期日

easytrader测试

参考

https://www.pythonheidong.com/blog/article/441219/5d4c33fffa0c6b5affa8/


github easytrader

https://easytrader.readthedocs.io/zh/master/

https://github.com/shidenggui/easytrader


win 10环境测试成功:

下载并安装python 32位

 https://www.python.org/

https://www.python.org/ftp/python/3.7.9/python-3.7.9.exe


按win+R打开CMD

下面一行一回车(软路由开梯子)

pip install pywinauto==0.6.6


pip install pypiwin32 pandas numpy scikit-learn pillow scipy pytesseract tesseract easytrader


安装微软运行库

https://ghpym.lanzous.com/ihUzwkgfz6h


下载并打开同花顺,登陆交易账户


然后在开始输入python打开

一行一回车

import easytrader

user = easytrader.use('ths')

user.connect(r'D:\同花顺软件\同花顺\xiadan.exe')

红字改为你同花顺xiadan.exe路径


输入user.balance

能刷出余额信息则成功


一键打新

user.auto_ipo()

2021年1月25日星期一

甲骨文\腾讯云重装 DD

帖子来源

https://git.beta.gs/


一键DD脚本,支持性好,更智能更全面,支持国内外各种VPS重装,特别是对国内各种访问国外资源慢的VPS安装有奇效。


更新说明:
20210909:支持debian11.
20210511:发现很多人不知道怎么DD甲骨文,使用支持uefi的镜像包即可.脚本已添加3个甲骨文专用选项23-25.
20210509:更新部分windows镜像,修正一处小问题.
20210127:更换部分windows镜像.
20210109:更新支持Ubuntu20.04安装,更新几个windows镜像.
20200708:更新自动为CN主机使用国内镜像源.


安装重装系统的前提组件:
Debian/Ubuntu:

apt-get install -y xz-utils openssl gawk file wget screen && screen -S os

RedHat/CentOS:

yum install -y xz openssl gawk file glibc-common wget screen && screen -S os

如果出现异常,请刷新Mirrors缓存或更换镜像源。
RedHat/CentOS:

yum makecache && yum update -y

Debian/Ubuntu:

apt update -y && apt dist-upgrade -y

使用:

wget --no-check-certificate -O AutoReinstall.sh https://git.io/betags && chmod a+x AutoReinstall.sh && bash AutoReinstall.sh

如为CN主机,可能出现报错或不能下载脚本的问题,可执行以下命令开始安装.

wget --no-check-certificate -O AutoReinstall.sh https://cdn.jsdelivr.net/gh/fcurrk/reinstall@master/AutoReinstall.sh && chmod a+x AutoReinstall.sh && bash AutoReinstall.sh
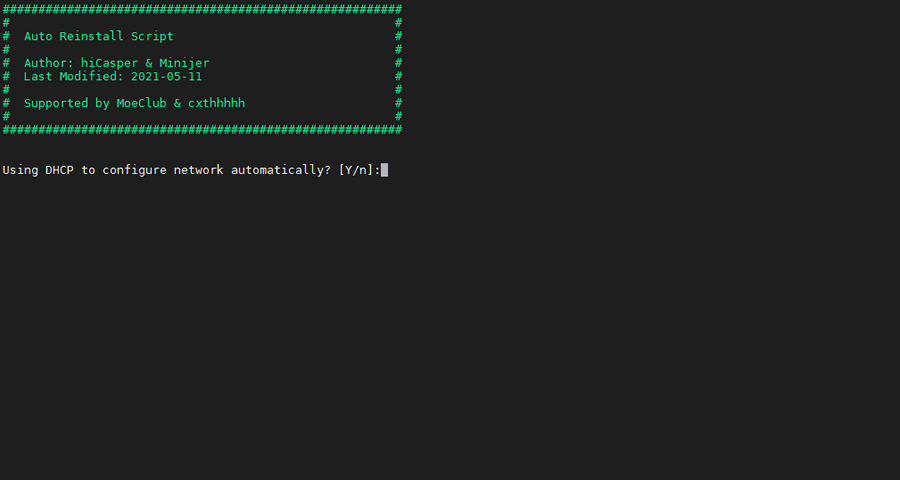

DD安装界面
输入Y确认DD后主机自动获取IP,N则自行设置IP 输入N后会自动检测出主机现用IP,如果正确可以按Y确认使用,如不正确则按N自行按正确的输入。
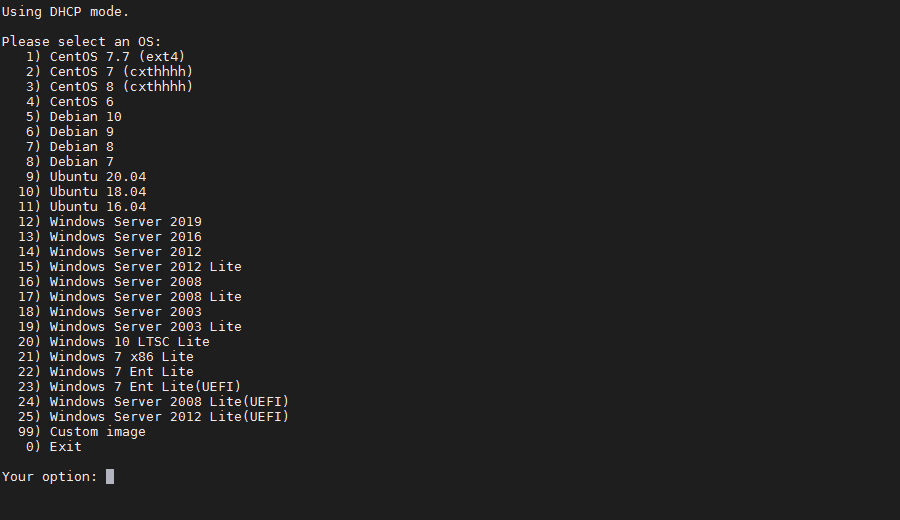
DD安装界面-选择系统
25合1的系统一键DD选择界面,输入99则使用自定义镜像。 以上系统密码不为默认密码的均为网络收集,如有疑虑使用自己的自定义镜像。

25合一系统密码:
1、CentOS 7.7 (已关闭防火墙及SELinux,默认密码Pwd@CentOS)
2、CentOS 7 (默认密码cxthhhhh.com)
3、CentOS 8 (默认密码cxthhhhh.com)
4、CentOS 6 (默认密码Minijer.com)
5、Debian 11 (默认密码Minijer.com)
6、Debian 10 (默认密码Minijer.com)
7、Debian 9 (默认密码Minijer.com)
8、Debian 8 (默认密码Minijer.com)
9、Ubuntu 20.04 (默认密码Minijer.com)
10、Ubuntu 18.04 (默认密码Minijer.com)
11、Ubuntu 16.04 (默认密码Minijer.com)
12、Windows Server 2019 (默认密码cxthhhhh.com)
13、Windows Server 2016 (默认密码cxthhhhh.com)
14、Windows Server 2012 (默认密码cxthhhhh.com)
15、Windows Server 2012 Lite (默认密码nat.ee)
16、Windows Server 2008 (默认密码cxthhhhh.com)
17、Windows Server 2008 Lite (默认密码nat.ee)
18、Windows Server 2003 (默认密码cxthhhhh.com)
19、Windows Server 2003 Lite (默认密码WinSrv2003x86-Chinese)
20、Windows 10 LTSC Lite (默认密码www.nat.ee)
21、Windows 7 x86 Lite (默认密码Windows7x86-Chinese)
22、Windows 7 Ent Lite (默认密码nat.ee)
23、Windows 7 Ent Lite (UEFI支持甲骨文)(默认密码nat.ee)
24、Windows Server 2008 Lite (UEFI支持甲骨文)(默认密码nat.ee)
25、Windows Server 2012 Lite (UEFI支持甲骨文)(默认密码nat.ee)
99、自定义镜像


注意:
经测试在谷歌云原版系统基础上DD会出现自动获取的子网掩码为255.255.255.255,如出现这种情况需要手工输入改正为正确的如255.255.255.0,否则会安装完成主机可能会离线。
Oracle Cloud(甲骨文云)可选择23-25一键DD,注意基础系统最好选择Ubuntu,如原系统是CentOS可能无法成功。

特别感谢:Vicer、cxt、hiCasper等各位技术大佬的脚本,站长只是脚本的"搬运工"。

版权申明:以上所有脚本、系统均为网络收集,站长不对资源的安全及版权纠纷负责,如有侵犯您的权益欢迎联系。
站长邮箱:minijer#beta.gs(#换成@)


下面是旧贴


甲骨文Ubuntu 16 DD成Win 7 来源https://hostloc.com/thread-747479-1-1.html

wget --no-check-certificate -qO InstallNET.sh 'https://tutu.bid/bash/InstallNET.sh' && bash InstallNET.sh -dd 'http://tutu.bid/os/dd/Oracle-Win7-X64%5BAdministrator-www.nat.ee%5D.gz'


--------------------------------------------------------------------------------------------


脚本1

wget --no-check-certificate -O AutoReinstall.sh https://git.io/AutoReinstall.sh && bash AutoReinstall.sh

默认密码为:Pwd@Linux

Pwd@CentOS


-----------------------------------甲骨文ubuntu关防火墙--------------------------------

sudo su

sudo rm -rf /etc/iptables && reboot


#修复xshell5意外丢包错误

nano /etc/ssh/sshd_config

KexAlgorithms curve25519-sha256@libssh.org,ecdh-sha2-nistp256,ecdh-sha2-nistp384,ecdh-sha2-nistp521,diffie-hellman-group14-sha1

---------------------------------------------------------------------------------

来源

https://akun.ltd/860.html


防止yum升级内核

修改yum的配置文件 vim /etc/yum.conf  

在[main]的最后添加

 exclude=kernel*


=============================

脚本2


sudo -i


bash <(wget --no-check-certificate -qO- 'https://moeclub.org/attachment/LinuxShell/InstallNET.sh') -d 10 -v 64 -a


腾讯云步骤:

web登陆ssh输入

sudo passwd root

设置root密码


然后web -实例-重置密码,再设置一次,会有强制重启

之后xshell 用户名ubuntu密码设置的那个登陆腾讯云,输入sudo -i

输入顶部或下面,开始dd

wget --no-check-certificate -qO InstallNET.sh 'https://moeclub.org/attachment/LinuxShell/InstallNET.sh' && chmod a+x InstallNET.sh

bash InstallNET.sh -d 10 -v 64 -a


开机密码  

MoeClub.org


开启BBR

echo net.core.default_qdisc=fq >> /etc/sysctl.conf

echo net.ipv4.tcp_congestion_control=bbr >> /etc/sysctl.conf

sysctl -p


改ssh端口

nano /etc/ssh/sshd_config

Debian9安装openssl 1.1.1i

 原文

依赖sudo apt-get install libnet-rawip-perl libssl-dev


  1. wget https://www.openssl.org/source/openssl-1.1.1g.tar.gz
  2. tar -zxf openssl-1.1.1g.tar.gz && cd openssl-1.1.1g
  3. sudo apt install make gcc
  4. ./config
  5. make
  6. sudo make install

  7. sudo ln -s /usr/local/bin/openssl /usr/bin/openssl
    
  8. sudo ldconfig 
openssl version

Your output should be as follows:

OpenSSL 1.1.1g  21 Apr 2020

2021年1月15日星期五

制作黑群晖U盘

1:使用balenaEtcher等U盘工具把synoboot.img写入U盘


2:使用DiskGenius把U盘grub.cfg复制到桌面,notepad++打开

3:使用chipgenius获得VID PID信息

      修改grub.cfg VID PID为U盘的信息保存

4:把修改后的grub.cfg覆盖回U盘同文件

5:U盘插入黑群晖,电脑访问群晖IP地址启动安装


caddy反代下载文件

# 监听端口 51110,提供静态文件服务和目录浏览 :51110 {     root * /home/tls     encode gzip  # 只启用 gzip 压缩     file_server {         browse     }     # 使用提供的证书...