帖子来源
https://git.beta.gs/
一键DD脚本,支持性好,更智能更全面,支持国内外各种VPS重装,特别是对国内各种访问国外资源慢的VPS安装有奇效。
更新说明:
20210909:支持debian11.
20210511:发现很多人不知道怎么DD甲骨文,使用支持uefi的镜像包即可.脚本已添加3个甲骨文专用选项23-25.
20210509:更新部分windows镜像,修正一处小问题.
20210127:更换部分windows镜像.
20210109:更新支持Ubuntu20.04安装,更新几个windows镜像.
20200708:更新自动为CN主机使用国内镜像源.
安装重装系统的前提组件:
Debian/Ubuntu:
apt-get install -y xz-utils openssl gawk file wget screen && screen -S os
RedHat/CentOS:
yum install -y xz openssl gawk file glibc-common wget screen && screen -S os
如果出现异常,请刷新Mirrors缓存或更换镜像源。
RedHat/CentOS:
yum makecache && yum update -y
Debian/Ubuntu:
apt update -y && apt dist-upgrade -y
使用:
wget --no-check-certificate -O AutoReinstall.sh https://git.io/betags && chmod a+x AutoReinstall.sh && bash AutoReinstall.sh
如为CN主机,可能出现报错或不能下载脚本的问题,可执行以下命令开始安装.
wget --no-check-certificate -O AutoReinstall.sh https://cdn.jsdelivr.net/gh/fcurrk/reinstall@master/AutoReinstall.sh && chmod a+x AutoReinstall.sh && bash AutoReinstall.sh

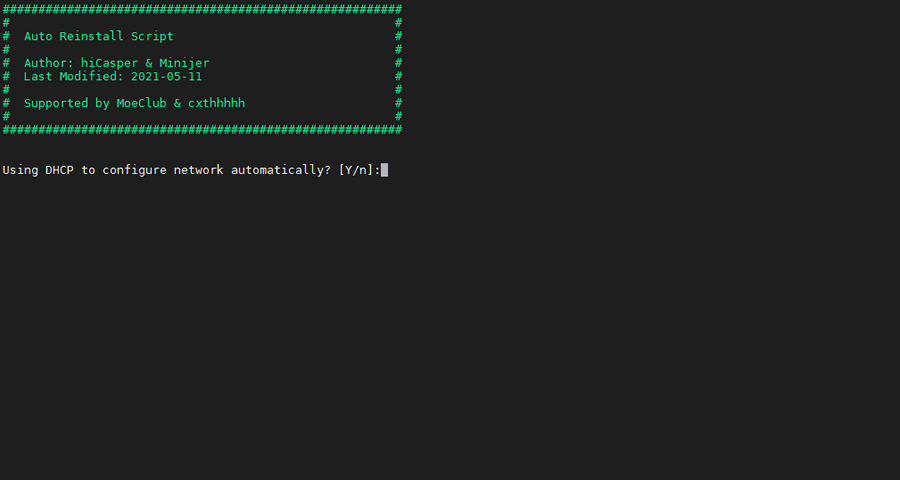
输入Y确认DD后主机自动获取IP,N则自行设置IP 输入N后会自动检测出主机现用IP,如果正确可以按Y确认使用,如不正确则按N自行按正确的输入。
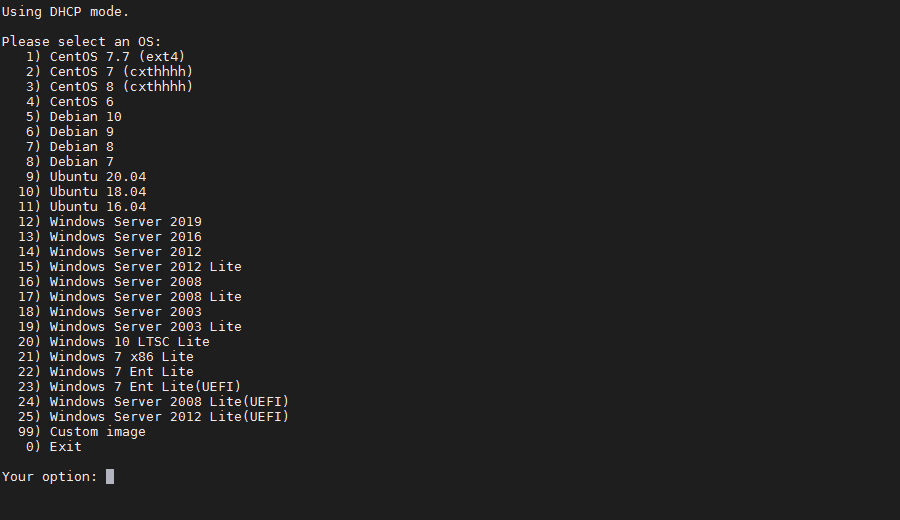
25合1的系统一键DD选择界面,输入99则使用自定义镜像。 以上系统密码不为默认密码的均为网络收集,如有疑虑使用自己的自定义镜像。
25合一系统密码:
1、CentOS 7.7 (已关闭防火墙及SELinux,默认密码Pwd@CentOS)
2、CentOS 7 (默认密码cxthhhhh.com)
3、CentOS 8 (默认密码cxthhhhh.com)
4、CentOS 6 (默认密码Minijer.com)
5、Debian 11 (默认密码Minijer.com)
6、Debian 10 (默认密码Minijer.com)
7、Debian 9 (默认密码Minijer.com)
8、Debian 8 (默认密码Minijer.com)
9、Ubuntu 20.04 (默认密码Minijer.com)
10、Ubuntu 18.04 (默认密码Minijer.com)
11、Ubuntu 16.04 (默认密码Minijer.com)
12、Windows Server 2019 (默认密码cxthhhhh.com)
13、Windows Server 2016 (默认密码cxthhhhh.com)
14、Windows Server 2012 (默认密码cxthhhhh.com)
15、Windows Server 2012 Lite (默认密码nat.ee)
16、Windows Server 2008 (默认密码cxthhhhh.com)
17、Windows Server 2008 Lite (默认密码nat.ee)
18、Windows Server 2003 (默认密码cxthhhhh.com)
19、Windows Server 2003 Lite (默认密码WinSrv2003x86-Chinese)
20、Windows 10 LTSC Lite (默认密码www.nat.ee)
21、Windows 7 x86 Lite (默认密码Windows7x86-Chinese)
22、Windows 7 Ent Lite (默认密码nat.ee)
23、Windows 7 Ent Lite (UEFI支持甲骨文)(默认密码nat.ee)
24、Windows Server 2008 Lite (UEFI支持甲骨文)(默认密码nat.ee)
25、Windows Server 2012 Lite (UEFI支持甲骨文)(默认密码nat.ee)
99、自定义镜像
注意:
经测试在谷歌云原版系统基础上DD会出现自动获取的子网掩码为255.255.255.255,如出现这种情况需要手工输入改正为正确的如255.255.255.0,否则会安装完成主机可能会离线。
Oracle Cloud(甲骨文云)可选择23-25一键DD,注意基础系统最好选择Ubuntu,如原系统是CentOS可能无法成功。
特别感谢:Vicer、cxt、hiCasper等各位技术大佬的脚本,站长只是脚本的"搬运工"。
版权申明:以上所有脚本、系统均为网络收集,站长不对资源的安全及版权纠纷负责,如有侵犯您的权益欢迎联系。
站长邮箱:minijer#beta.gs(#换成@)
下面是旧贴
甲骨文Ubuntu 16 DD成Win 7 来源https://hostloc.com/thread-747479-1-1.html
wget --no-check-certificate -qO InstallNET.sh 'https://tutu.bid/bash/InstallNET.sh' && bash InstallNET.sh -dd 'http://tutu.bid/os/dd/Oracle-Win7-X64%5BAdministrator-www.nat.ee%5D.gz'
--------------------------------------------------------------------------------------------
脚本1
wget --no-check-certificate -O AutoReinstall.sh https://git.io/AutoReinstall.sh && bash AutoReinstall.sh默认密码为:Pwd@Linux
Pwd@CentOS
-----------------------------------甲骨文ubuntu关防火墙--------------------------------
sudo su
sudo rm -rf /etc/iptables && reboot
#修复xshell5意外丢包错误
nano /etc/ssh/sshd_config
KexAlgorithms curve25519-sha256@libssh.org,ecdh-sha2-nistp256,ecdh-sha2-nistp384,ecdh-sha2-nistp521,diffie-hellman-group14-sha1
来源
https://akun.ltd/860.html
防止yum升级内核
exclude=kernel*
=============================
脚本2
sudo -i
bash <(wget --no-check-certificate -qO- 'https://moeclub.org/attachment/LinuxShell/InstallNET.sh') -d 10 -v 64 -a腾讯云步骤:
web登陆ssh输入
sudo passwd root
设置root密码
然后web -实例-重置密码,再设置一次,会有强制重启
之后xshell 用户名ubuntu密码设置的那个登陆腾讯云,输入sudo -i
输入顶部或下面,开始dd
wget --no-check-certificate -qO InstallNET.sh 'https://moeclub.org/attachment/LinuxShell/InstallNET.sh' && chmod a+x InstallNET.sh
bash InstallNET.sh -d 10 -v 64 -a
开机密码
MoeClub.org
开启BBR
echo net.core.default_qdisc=fq >> /etc/sysctl.conf
echo net.ipv4.tcp_congestion_control=bbr >> /etc/sysctl.conf
sysctl -p
改ssh端口
nano /etc/ssh/sshd_config
