2020年8月19日星期三

V2Ray和Trojan共存 TLS分流器 一键脚本

README.md


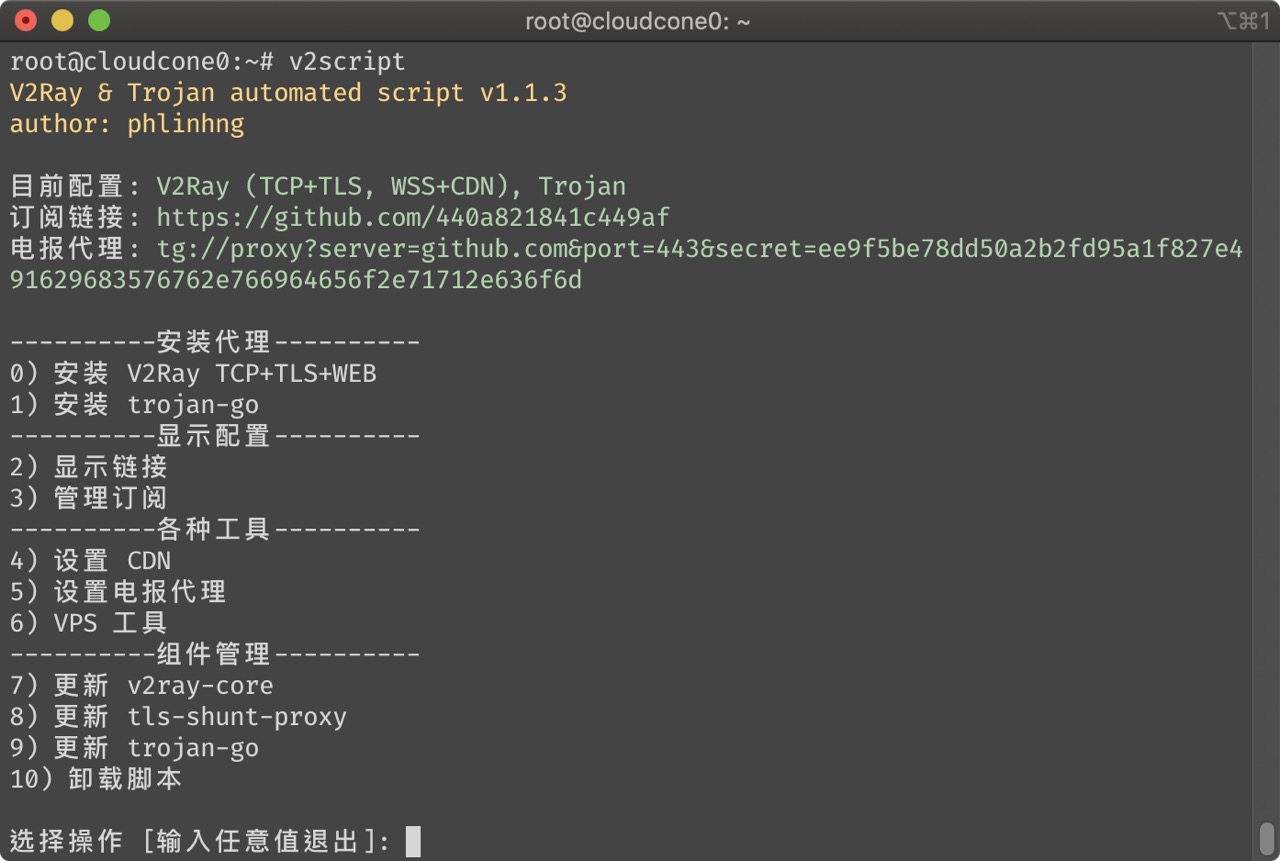
V2RAY TCP+TLS+WEB / WSS+CDN and Trojan-go

automated script for V2Ray (TCP+TLS+Web), V2Ray (WSS+CDN), and Trojan-go

Usage

curl -fsSL https://raw.githubusercontent.com/phlinhng/v2ray-tcp-tls-web/vless/src/v2gun.sh -o ~/v2gun.sh && bash ~/v2gun.sh

Screenshot

alt text


来源
https://github.com/phlinhng/v2ray-tcp-tls-web

可以配合BBR PLUS一键脚本
wget -N --no-check-certificate "https://github.000060000.xyz/tcpx.sh" && chmod +x tcpx.sh && ./tcpx.sh

2020年8月16日星期日

PVE Proxmox VE 删除LVM,只用一个分区 /local 扩容 /合并分区 /开启BBR+CT-Docker

用PVE遇到空间不足的朋友, 肯定有想过,local和local-lvm两个如果合并,可以节省出来不少可用空间。
下面介绍实现的方式:
PVE 5.4出厂设置为例:

#备份虚拟机
#删除虚拟机

ssh连接母机 (PVE-Console)
#删除local-lvm,
lvremove pve/data

#按Y确定


#增加分区空间
lvextend -l +100%FREE -f pve/root

# 执行生效
resize2fs /dev/mapper/pve-root 

#重启
reboot

然后到WEB UI里,先删掉local-lvm(edit旁边的Remove)
然后按箭头操作


来源:
https://www.jianshu.com/p/bdb83531c56d


==================

优化内核参数

==========================


如果是海外的独立服务器,建议开启BBR来优化TCP传输,开启方法如下:

#修改内核配置
cat >>/etc/sysctl.conf << EOF
net.core.default_qdisc=fq
net.ipv4.tcp_congestion_control=bbr
EOF
#使配置生效
sysctl -p

使用命令lsmod |grep bbr进行验证,当看到tcp_bbr字样,说明BBR开启成功。

Linux默认描述符为1024,为避免后期出现各种问题,建议修改ulimit描述符限制,修改方法如下:

echo 'fs.file-max = 65535' >> /etc/sysctl.conf
echo '* soft nofile 65535' >> /etc/security/limits.conf
echo '* hard nofile 65535' >> /etc/security/limits.conf
echo 'ulimit -SHn 65535' >> /etc/profile


==========PVE CT机增加Docker功能====================
例如CT100是Debian10 CT机,为了让他支持Docker

PVE母鸡ssh敲入

nano  /etc/pve/lxc/100.conf


添加下面三行

lxc.apparmor.profile: unconfined
lxc.cgroup.devices.allow: a
lxc.cap.drop:


#保存

ctrl+o

#重启CT100 机

#之后CT机ssh一键添加docker

apt update && apt install curl -y && curl -fsSL https://get.docker.com -o get-docker.sh && sh get-docker.sh


-------------------------备用----------------------------------------
#删除订阅
sed -Ezi.bak "s/(Ext.Msg.show\(\{\s+title: gettext\('No valid sub)/void\(\{ \/\/\1/g" /usr/share/javascript/proxmox-widget-toolkit/proxmoxlib.js && systemctl restart pveproxy.service

更换软件源
mv /etc/apt/sources.list.d/pve-enterprise.list /etc/apt/sources.list.d/pve-enterprise.list.bak
# 屏蔽订阅企业源
wget https://mirrors.ustc.edu.cn/proxmox/debian/proxmox-release-bookworm.gpg -O /etc/apt/trusted.gpg.d/proxmox-release-bookworm.gpg
echo "deb https://mirrors.ustc.edu.cn/proxmox/debian bookworm pve-no-subscription" > /etc/apt/sources.list.d/pve-no-subscription.list
# 使用Proxmox非企业版中科大源
sed -i 's|^deb http://ftp.debian.org|deb https://mirrors.ustc.edu.cn|g' /etc/apt/sources.list
sed -i 's|^deb http://security.debian.org|deb https://mirrors.ustc.edu.cn/debian-security|g' /etc/apt/sources.list
# 将Debian官方源替换为中科大源
echo "deb https://mirrors.ustc.edu.cn/proxmox/debian/ceph-quincy bookworm no-subscription" > /etc/apt/sources.list.d/ceph.list
# 替换Ceph源
sed -i 's|http://download.proxmox.com|https://mirrors.ustc.edu.cn/proxmox|g' /usr/share/perl5/PVE/APLInfo.pm
# 替换CT镜像下载源(重启PVE才能生效)
apt update 
#更新源列表
apt upgrade 
#升级软件包
apt dist-upgrade 
#升级系统
apt install openvswitch-switch
#安装OVS
-------------------------备用----------------------------------------

-------------------------备用----------------------------------------


-------------------------备用----------------------------------------
目前的Proxmox VE版本的linux内核版本比较新,已经包含了bbr模块了。
#母机ssh输入下面3行
echo "net.core.default_qdisc=fq" >> /etc/sysctl.conf
echo "net.ipv4.tcp_congestion_control=bbr" >> /etc/sysctl.conf
sysctl -p

#检测是否已启用bbr模块
lsmod | grep bbr
如果含有bbr即说明内核内已启用bbr模块
2020年8月7日星期五

歌华链刷入Breed教程

我总结了网上多篇教程,浓缩以下

下面以歌华链官方固件默认操作
192.168.9.1 admin 本地升级下面固件(为web刷入bl解锁固件做准备)
https://www.lanzoux.com/ihjCjfd43oj


自动重启后telnet进192.168.9.1 admin admin
输入下面代码刷入bl解锁固件
cd /tmp && wget http://3322d.f3322.net:16999/other/gehualian/firm1.21.bin && mtd write -r /tmp/firm1.21.bin firmware

自动重启后,telnet 2317端口登录telent,用户名root密码admin
输入下面输入breed
cd /tmp && wget http://3322d.f3322.net:16999/other/gehualian/breed-mt7621-gehua-ghl-r-001.bin && mtd write -r breed-mt7621-gehua-ghl-r-001.bin Bootloader

2020年8月4日星期二

友华 WR330 / WR1200JS 官方固件开telnet在线刷Breed


友华WR330步骤:WR1200JS看底部

进192.168.0.1输入用户密码登陆-点左侧系统管理
改用户名为1234
密码1234a访问http://192.168.0.1/adm/telnetd.shtml
telnet右边按钮显示ON那里按成OFF


telnet 连接192.168.0.1  (工具用xshell或putty都可以)
账号密码1234 1234a
下面一整行回车

cd /tmp && wget http://3322d.f3322.net:16999/other/breed/breed-mt7621-pbr-m1.bin && mtd_write write /tmp/breed-mt7621-pbr-m1.bin Bootloader

然后断电,按住背后靠近网口的WIFI按钮 插电等3秒松,进breed 192.168.1.1 

完工


=============WR1200JS=====================
主页是

2020年7月30日星期四

通过AutoHotKey 让Windows 10也支持Ctrl + space切换输入法

以下方法简单实用,可以让Windows 10也支持Ctrl + space切换输入法。

下载并安装AutoHotKey. 在百度搜索一下AutoHotKey就能找到官网。

右键-新建记事本,命名为inputmethod.ahk
填写以下内容:

^Space::#Space

可以放到任意位置,记住不要被误删除了。

右键刚保存的"inputmethod.ahk", 选择"创建快捷方式"。

复制"inputmethod.ahk - 快捷方式" 到 "C:\\Users\\yourname\\AppData\\Roaming\\Microsoft\\Windows\\Start Menu\\Programs\Startup". 记住把yourname换成你电脑的账号名称。

(可用everything搜索Programs\Startup快速定位)

重启电脑。

重启成功后,Ctrl + space就可以切换输入法啦:)


原文網址:https://kknews.cc/code/zn9bkxl.html

2020年7月21日星期二

路由跑iperf PC 测速

文章来源


OpenWRT安装iperf3
opkg update
opkg install iperf3

二、路由器端后台运行iperf3

iperf3 -s -D


3.电脑或者手机连接上路由器的有线(或者无线,看你测什么速度),然后运行iperf3测速。

软件下载链接如下https://iperf.fr/iperf-download.php
找到适合自己平台的下载下来。

如果你是Windows 64位用户,

下载这个https://iperf.fr/download/windows/iperf-3.1.3-win64.zip
解压的文件夹目录空白处按住shift+右键-在此处打开命令窗口

单线测试命令:ip改成路由地址

iperf3 -c 192.168.2.1 -b 1000m -t 60 -i 1 -u

-c表示运行的是客户端模式,就是测速发送方。 -b表示估计带宽,-t表示持续测速时间,就是一共跑60秒,-i表示间隔输出结果时间,就是每隔1秒钟输出一次,-u表示使用udp连接来测速,默认是tcp连接测速,因为tcp要进行确认所以不如udp测速更准确。当然这里默认使用了单线程

2线测试命令:

iperf3 -c 192.168.2.1 -b 1000m -t 60 -i 1 -u -P 2


附 贝壳云ARM OpenWRT+USB3.0 RTL8153做WAN时测速


2020年7月5日星期日

反向代理/内网穿透· 实战V2Ray 家宽中转

使用情况:
移动连去韩国一个节点速度不理想;朋友家的电信家宽公网速度理想。
移动连去电信家宽获得加速。

需要怎么做:
电信公网路由,Padavan或OpenWRT跑V2Ray预编译文件

tmp/v2ray/放进V2Ray单文件,chmod +x v2ray 添加执行权限

/etc/storage/v2ray/config.json 填写

{
  "inbounds": [{
  "port": 53888, #大陆中转传入端口
  "listen": "0.0.0.0",
  "protocol": "dokodemo-door",
  "settings": {
    "address": "1.2.3.4", #境外节点ip或域名
    "port": 22345, #境外节点端口
    "network": "tcp,udp"
  },
  "tag": "",
  "sniffing": {
    "enabled": true,
    "destOverride": [
      "http",
      "tls"
    ]
  }
}],

  "outbounds": [{
    "protocol": "freedom",
    "settings": {}
  },{
    "protocol": "blackhole",
    "settings": {},
    "tag": "blocked"
  }],
  "routing": {
  }
}

ssh输入
cd /tmp/v2ray && ./v2ray --config=/etc/storage/v2ray/config.json >/dev/null 2>&1 &


Padavan 端口转发-添加一条53888转发到Padavan路由IP的 both tcp udp

这样就完成了。


测试:
机场节点,改为大陆ip和端口53888

改好后v2rayN.exe 按ctrl+R测试真实连接,有延时返回代表正常工作。

实测v2或ss可用。


资料参考:

在VPS上,把onedrive/google team drive 网盘 映射出webdav:8080 ( rclone )

1:pc rclone 挂载上网盘后,复制配置文件到vps上 vps输入下面临时建立webdav rclone serve webdav od: \   --addr 0.0.0.0:8080 \   --user admin --pass 'admin' \  ...